
Creating a multilingual travel blog is the best way to entice your travel enthusiast audiences from different parts of the world.
You will also make your visitors happy by creating a website version in their native language. So, how can you do it?
Well, there are many methods to create a multilingual travel blog. However, you will find it more comfortable if your travel blog is on WordPress. Then, you just have to install a multilingual plugin, and within a few steps, you will have a multilingual blog ready for disposal.
In this detailed article on how to create a multilingual travel blog, we will demonstrate the step-by-step guide of creating a multilingual travel blog using a WordPress plugin. Let’s keep the plugin’s name secret for now!
Moreover, we will also list out different methods of translating your travel blog into other languages. The comprehensive FAQs section should also help to clear your further doubts.
Now, let’s begin!
Methods of Translating Your Travel Blog Into Different Languages
Here, we will talk about four different methods to create a multilingual travel blog. They are:
Method 1: In-Browser Translation
The in-browser translation method involves publishing one single blog in English and then translating to other preferred languages using multilingual plugins. The translation process takes place whenever a visitor arrives on your travel blog.
In this method, the translation happens on-demand within the browser, and your reader can see the new language version only at that moment. But, this method won’t help you rank your blog on Google for other languages because the plugin only translates text within the visitor’s browser.
Method 2: Publish Two Separate Top-Level Domains
The second method involves publishing two different blogs on different top-level domains, like testblog.com and testblog.es. It makes the most sense for businesses that operate in multiple countries as the domain extensions like com and es are associated with countries.
Comparatively, method 2 is better for search engines than method 1. It is because you will be creating separately hosted content in each language. In the meantime, it spreads your Domain Authority (DA) on two different websites and creates the situation of having to independently rank two different websites.
This method is not ideal if your visitors come from one country and you just want to cater to different languages within that country.
Method 3: Using Subdomains for Each Language
The third method only requires one top-level domain like testblog.com, and it involves hosting each language site on a separate domain. For instance, en.testblog.com and es.testblog.com. This process is easier for condensing the DA because you will be working with one top-level domain.
Method 4: Using Directories for Each Language
This fourth method is all about using directories to hold each language’s pages. For instance, testblog.com/en/ and testblog.com/es/. This method is very convenient for bloggers because it only requires maintaining one website and database.
Using this method, you will be publishing two or more unique versions of each article. For instance:
English: https://www.testblog.com/location/
Spanish: https://www.testblog.com/divorce/localización
It is one of the best methods if you are a travel blogger looking to build domain authority for one website.
Multilingual Plugins for Creating a Multilingual Travel Blog
There are many multilingual plugins that you can find on the WordPress marketplace to create a multilanguage travel blog. The following are two main WordPress multilanguage plugins:
1. WPML
WordPress Multilanguage Plugin (WPML) is one of the most popular translation plugins that can handle the translation needs of any website, big or small. This plugin lets you translate pages, posts, menus, customs types, taxonomy, and even your theme’s texts.
WPML introduces over 40 languages. Besides, you can also add your language variants like Canadian French or Mexican Spanish using the plugin’s languages editor. It is a good fit for multisite as it allows you to place each language version on the same domain, sub-domain, or completely different domain.
You need to purchase the WPML plugin to use it on your WordPress blog. The premium pricing starts at $29 per year.
Key Features:
- It lets you build and run multilingual e-commerce websites
- Available in both multilingual blog and multilingual CMS versions
- Limitless options to translate your blog
- Allows you to connect with third-party translation service providers
- Quick and reliable customer support
2. Polylang
Polylang is a free option from WordPress that lets you create a bilingual or multilingual WordPress website. This plugin needs you to translate content by yourself without linking up to any translation service.
This WordPress plugin comes with a simple user interface to easily add translations for your posts, pages, widgets, custom post types, and so on. The translated content can be placed on sub-directories, sub-domains, and even separate domains.
You can pick from close to a hundred languages on the settings screen. Similarly, you can select the appearance of the name of the language on your screen and add the appropriate country flag.
If you prefer more advanced features, you can switch to the premium version of the Polylang plugin that starts at $120 or 99 00€.
Key Features of Polylang:
- Lets you add a language switcher widget or navigation menu
- Fully compatible with RTL scripts
- Supports unlimited languages
In this guide, we will reveal to you how to create a multilingual travel blog using the free version of the Polylang plugin.
Steps To Create Multilingual Travel Blog Using Polylang Plugin
Before we commence our guide on how to create a multilingual travel blog using the Polylang plugin, we understand that you have done the following things:
- Choose a domain name for your travel blog
- Registered a domain name set up web hosting
- Installed WordPress on your travel blog
- Installed the appropriate travel blog WordPress theme
- Installed other necessary WordPress plugins
In case you are confused about that, please follow our detailed guide on how to start a travel blog.
Now, let’s get started with our first step, i.e., installing the Polylang plugin.
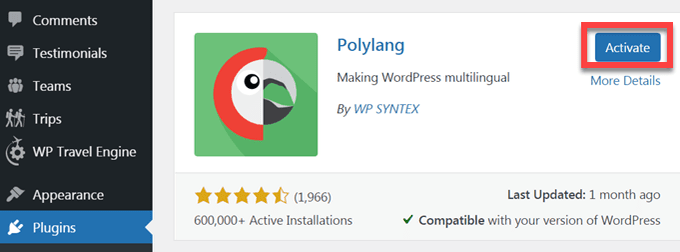
Step 1: Install Polylang Plugin.
To begin the process, log in to your WordPress dashboard and redirect to Plugins > Add New from the left side panel.

Now search for the Polylang plugin by typing it on the search bar located in the top right corner.

Once you get the search results, click on the Install Now button to install the plugin and then click Activate to activate it on your WordPress.
Upon activation, you can see the Languages option on the left side panel of your WordPress dashboard.

Next up, you need to go ahead and configure the Polylang plugin. You can do it by adding the languages to your travel blog.
Step 2: Add Languages to Your Travel Blog.
Now, you are in the next and the most crucial step. Here, we will show you how to add languages to your travel blog via Polylang.
Navigate to Languages from the left side panel of your WordPress dashboard.
Now, from the drop-down menu, choose the first language. If you don’t prefer the English version of your travel blog, select another language from the drop-down and click the Add new language button.
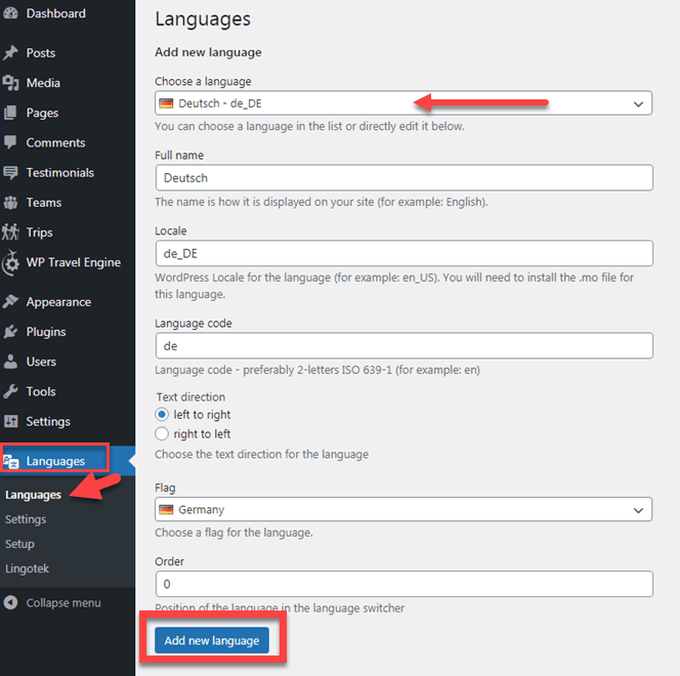
Similarly, you can add other languages as per your preference. Here, we will show you by adding Italiano as the second language.
You can see the languages you have added on the right side of your screen, as shown in the image below.

We will show you how to set the default language for the existing posts, pages, categories, and tags in the next step.
Step 3: Set a Default Language.
You can hover over the star symbol and click it to set up a default language. The colored star in the language indicates the default language. In our case, Italiano is the default language.

In the next step, we will show you how to set up a language switcher using a navigation menu and widget.
Step 4: Set Up Language Switcher.
Polylang plugin introduces the language switcher option to help your visitors easily switch to their preferred language. You can keep the language switcher in either the navigation menu or the sidebar of your website using the widget. Here, we will show you both processes.
Using Navigation Menu
It is easy to add the language switcher option in the menu bar to allow your visitors to navigate to the other versions of your travel blog. Follow the following steps to add the language switcher option in the menu bar:
From your WordPress dashboard, redirect to Appearance > Menus. Now, tick the Languages checkbox under the Language Switcher and then click the Add to Menu button. After that, click the Save Menu button on the right-hand side to continue.

If you don’t find the Language Switcher option in the menu section, click on the Screen Option on the top right of your screen and then tick the Language Switcher option.

After you add the language switcher to the menu, visit your website. Your website should have a language switcher, as shown in the image below.

Using Widget
Next up, you can also add the language switcher option on your travel blog using the widget area. You can pace the language switcher on the sidebar widget or footer widget. Follow these steps to add a language switcher using the widget:
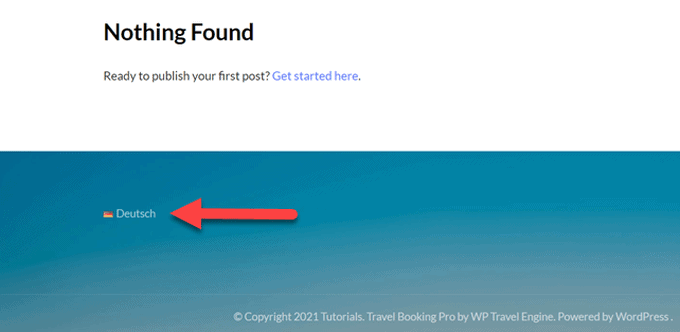
Redirect to Appearance > Widget from the left side panel of your WordPress dashboard. Now, drag the Language Switcher widget and place it on your desired sidebar or footer if your theme supports it.


After you add the language switcher in the widget, visit your website. Your website should have a language switcher, as shown in the image below.
Step 5: Theme Panel Translation
Once you add a language into the Languages menu, you should translate the components of the theme.
To do that, redirect to Languages > String Translations.

In this section, you can translate various user-defined components of the website like your site title, tagline, widget title, and more. The theme also lets you translate theme and plugin options.
The string column holds the strings of the default language. You can translate these strings into the additional language which you have installed on your travel blog.
Enter the translated strings into the input fields of the translation column, as shown in the image above. Once you finish entering the translated strings, click on the Save Changes button in the bottom right corner.

Step 6: Advanced Polylang Settings
Here, we will demonstrate some of the advanced settings of the Polylang plugin, which involves URL modifications, browser language detection, etc.
URL Modifications
The Polylang plugin allows you to carry out the URL modification process for different languages of your travel blog’s posts, pages, and categories. This helps you to take full advantage of multilingual SEO.
Navigate to Languages > Settings from the left sidebar of your WordPress dashboard. Select the URL Modification option and tick the box as shown in the image below before clicking the Save Changes button.

Detect Browser Language
You can activate the Detect browser language setting by redirecting to Languages > Settings. This section is just below the URL Modification section.

Once you activate this option, your blog visitors will first see the website in the language set as the preferred language in their browsers.
Media
Once you activate the media option, the plugin by default translates the texts associated with the media items such as title, alt text, and description.
You can locate this section just below the Detect browser language section under Languages > Settings.

Step 7: Translation of Categories, Pages, Posts, and Tags
Here, we will show you the process of creating a multilingual post of the existing posts. You can follow these steps and create different versions of your existing pages, categories, and tags of your travel blog in different languages.
Navigate to Posts > All Posts and click on the “+” sign next to the language flag in any one of the posts.

Once you click the “+” sign, you will get redirected to a page for creating new posts. There, you need to enter the manual translation for the existing post.
You can then enter the translated text for the language you selected.
Frequently Asked Questions (FAQs)
In which language should I write my travel blog posts?
Well, this wholly depends on who you are targeting with your blog posts. It is evident that the English language has the biggest market on the internet, and most people understand this common language. Therefore, if your English is excellent and the people you are trying to reach are reading in English, you should write your blog posts in English. However, that’s not it!
There are thousands of success stories of people blogging in their native language and attracting many audiences. As a result, you can still create your blog posts in Chinese, German, or Spanish, or Hindi, if the visitor you target speaks the same language.
In the meantime, you can also opt for multilingual plugins to convert your blog to multiple languages.
Are there any disadvantages of blogging in foreign languages?
Dual language blogs are not the best way to go! Google has a hard time ranking your website as it can get confused by the two different languages. Besides, it also finds it difficult to understand who the website is targeting and feels it cannot provide good value to its users.
Hence, if you are writing in two languages, your website won’t rank as well as it would have, had it been written in one main language.
Are there other ways to translate a blog post?
Yes, there is! Google offers a free tool named Google Translate, which helps you to translate your blog content to over 100 languages quickly. You just need to type or copy-paste the text into the box and let the tool detect the language for you. Next up, choose the language you want to translate it to and see the translated result.
However, as per Google guidelines, the search engine doesn’t prefer the text translated by an automated tool without human review or curation before publishing.
Conclusion
Creating a multilingual travel blog is the best way to boost your website’s user experience. With a popular theme that supports multilingual plugins, you can easily build a multilingual blog that attracts a wide range of visitors.
A multilingual travel blog serves everyone’s purpose, from a native English speaker to someone with foreign language skills. Similarly, by creating a bilingual blog, you get to improve your knowledge of different languages.
We hope that this complete guide helps you to create a multilingual travel blog for your needs. Feel free to share with us if you have any other multilingual theme or a translation plugin to make this process easier.
If you want to read more articles related to travel, you may look at the following:


