
Studies show that users are 2.5 times more likely to click on a website displayed in their native language. [Source]
By making your travel website accessible in multiple languages, you instantly gain access to a broader potential audience, including international markets.
This lets you tap into new customer segments, build trust, and make them more likely to book with you.
This guide walks you through translating your entire travel website in simple steps. We’ll explore the benefits of translating websites and help you choose the best translation method for your needs.
Why Translate Your Travel Booking Website?
Translating your travel booking website into multiple languages can have several benefits, including:
- By offering content in multiple languages, you can reach potential customers worldwide regardless of their native language and significantly increase website traffic.
- Users are more likely to engage with content presented in their native language.
- By making it easy for people to understand your website and book your packages, you are more likely to increase your website bookings.
- You gain a competitive edge over businesses that only operate in one language.
- It improves your website’s search engine visibility and organic traffic, as Google favors websites available in multiple languages.
- It helps you to build trust and credibility with travelers.
- In some regions, it’s legally required to provide information in the native languages of the users.
Which Translation Method is Right for You?
There are several ways to translate your website, each with its own advantages and disadvantages, such as:
1. Manual/Human Translation
This method involves human translators converting content from one language to another. It is one of the best options for translations that require a high degree of accuracy.
While manual translation delivers unmatched quality, it can be time-consuming for extensive projects. Additionally, professional services often come at a premium, especially when deadlines are tight.
2. Machine Translation/Rely on Browsers
Machine translation, also known as automated translation, uses artificial intelligence to translate the content of a page from one language to another. The best example of this method is Google Translate.

In addition, if you need the easiest and fastest way to translate your website and don’t prioritize accuracy, there is one easy option right in your web browser.
Thanks to the built-in translation tools of popular browsers like Google Chrome, web pages can be automatically translated for you based on your browser settings.
However, this method lacks control of the translation accuracy, potentially damaging your brand’s reputation by misrepresenting your content.
Therefore, relying on browsers for translation is only suitable when multilingual content is not a top priority.
Google Chrome, Mozilla Firefox, Microsoft Edge, and Safari are well-known browsers that can automatically translate your website.

3. WordPress Translation Plugins
If your website runs on WordPress, there are numerous translation plugins to help you out, such as WPML, Polylyang, Translate Press, and so on. These tools offer a mix of both human and machine translation.
It translates your entire website content using machine translation. Then, it lets you manually edit the automated translations using its in-context editor or translations list – depending on your preference.
When businesses want to make their content available for multiple foreign markets, we no longer talk of translation but of localization.
Some of the popular WordPress translation plugins that you can use to create your multilingual website are:

Loco Translate is a free and easy-to-use translation plugin that allows you to translate your website into multiple languages.
It is perfect for beginners, offering a straightforward interface and comprehensive translation capabilities. The plugin also gives you the power to edit translations directly in your WordPress dashboard, which is super handy for quick changes.
2. GTranslate

GTranslate is a translation WordPress plugin that uses Google Translate API.
It is a freemium plugin that can quickly and easily translate your website into multiple languages. The plugin also comes with the added benefit of automatic updates, so your translations stay up-to-date without extra work from you.

TranslatePress is a premium translation plugin that lets you translate your website content visually, directly from the front end of your site.
It is user-friendly and offers features such as real-time translation, SEO optimization, and WooCommerce compatibility.
4. Polylang

Polylang is a free WordPress plugin that allows you to create a multilingual website.
It supports over 200 languages, including RTL scripts. You can translate posts, pages, categories, tags, menus, widgets, and custom post types.
5. WPML

WPML is a powerful WordPress translation plugin that allows you to create a multilingual website in a user-friendly way.
It is a good option for travel businesses of all sizes that want to reach a global audience and improve their SEO. WPML supports over 40 languages, including RTL scripts.
How to Translate a WordPress Site with the GTranslate plugin
Now that you know the different translation methods, let’s dive deeply into a step-by-step guide on translating your website into multiple languages using GTranslate.
Step 1: Install and Activate GTranslate
- Go to the Plugins from your admin dashboard and click Add New.
- In the search box at the top of the page, type GTranslate and press enter.
- Click Install Now and then Activate the plugin.

Step 2: Configure GTranslate
By adding this option, you’ll be offering your visitors the ability to explore your site’s content in their desired language.
After you have installed the GTranslate plugin, you are ready to configure it for your site. Follow the below-given steps:
- Go to Settings > GTranslate in your admin dashboard.
- Here, choose the languages you’d like your visitors to have access to when viewing your site.

- Next, decide where you want to display the translation options. Choose either the Primary Menu or the Footer Menu.
- Choose Primary Menu if you prefer it to be accessible at the top right corner of your site.
- Or select Footer Menu to have it appear at the bottom.

- Click Save Changes after making your choice.
Your website will now display the translation menu option, making it easy for your visitors to switch to their preferred languages.

Now that the translation menu is in place let’s verify that the translations are displayed correctly across your website.
- Visit your website and switch to a language other than your default language.
- Carefully examine the translated content to ensure it accurately reflects the original text and maintains the intended meaning.
- If everything looks good, you’re all set!
How To Make Your Travel Website Multilingual Using Polylang Plugin
Polylang enables us to take several routes to set up a multilingual WordPress website. You can go manual, choose automatic translations, or hire professionals through the plugin. This time, we’ll explore the manual end of things.
Step 1: Install and Activate Polylang plugin
- Go to your WordPress dashboard and navigate to the Plugins > Add New.
- In the search bar, type Polylang and press Enter.
- Click the Install Now button next to the Polylang plugin.

- Once the plugin has been installed, click the Activate button.
Step 2: Configure Polylang
After activating the plugin, you’ll be guided through a simple setup wizard that will help you configure the plugin’s essential settings. You can either complete this process now or skip it for the time being and configure the plugin later from your WordPress dashboard.
If you choose to skip the setup wizard, don’t worry; you can always access and modify the plugin’s settings from your dashboard at your convenience.
To configure the plugin manually, follow these steps:
- After activation, go to Languages in your WordPress dashboard.

- Select the Choose a language option above and pick the language you want to add to your website from the available list.

- Now, click on Add new language to confirm your selection. Repeat this process for any additional languages you want to add.

Once you’ve added all languages, your choices will appear on the table to the right of the screen.

- Choose the default language for your website by clicking on the star icon next to the desired language.

Step 3: Translate Your Pages and Posts
Polylang allows you to create linked versions of your pages and posts in different languages. Here’s how to create a translated version of an existing page:
- Go to one of the pages or posts you want to translate and open the editor.
- Scroll down to the Languages section below the post editor. You will find the drop-down list inside that enables you to switch between languages.

In our example, existing pages are in English (The default language).
- To create a version of the page in another language, click on the “+” sign next to the flag of the desired language.
- This will open a page editor for a new empty version of the page. We decided to add an Italian version of the page in our example.

- Name your page, and add your translated page content. Once you’re done, click Publish to create the translated page.

As a result, you will have two different and connected pages: one in the original language and one in the translated language. When you check the Polylang options for these pages, you will notice that each page has its corresponding language flag mark.
Additionally, translated versions will have a “pencil” icon, indicating that the translation exists.

Polylang also enables you to translate categories, tags, and custom taxonomies with ease.
Follow the same process outlined above for translating pages and posts, but instead of selecting a page or post, select the category, tag, or custom taxonomy you want to translate.
Step 4: Translate Menus and add a Language Switcher to the Header
Now that you’ve translated your pages and posts, it’s time to translate the menus and add a language switcher to allow your website visitors to switch between languages seamlessly.
Translate Primary (or any other) Menu
- Navigate to Dashboard > Appearance > Menus and select your Primary Menu.

- Scroll down and locate Display locations. You’ll notice that Polylang has added a primary menu location for each language you’ve added.

- Now, let’s create a menu for another language, i.e., Italian. Click on Create a new menu.
- Assign a name to the menu and add the corresponding language versions of pages, posts, and any other items you want to include in this menu.
- Under Display locations, select the primary menu for your language.

- Click on Save Menu to finalize the translated menu.
Adding the Language Switcher
Our final step here is to add the Language Switcher.
- Go to Dashboard > Appearance > Menus and select your Primary Menu for your default language, i.e., English.
From the menu items, under the Language Switcher section, select the Languages option and click the Add to Menu button to add it to your menu.

If you don’t see the Language switcher section under Add menu items, please click on the Screen Options on the top of your screen and add this option.

- Drag and drop the Language Switcher item to position it in your Primary Menu.
- Click on the Language Switcher item to expand it. Here, you have several options to set the way your Language Switcher looks.

- Click on Save Menu to save changes.
Repeat the above steps for each language to add the switcher on all of them.
Great job! Your multilingual travel website is ready for your visitors.
If you want to learn more about Polylang, you can check their official Polylang documentation.
Additional Tips: In addition to Polylang, you can also use the WPML plugin to create a multilingual website. Both plugins offer similar features and an exact installation process.
How To Translate Your Travel Site Using Loco Translate
Now, let’s get a little technical about the translation.
WordPress themes and plugins often come with default text strings that might not match the language of your target audience. For instance, you’ve likely noticed the comment section of every blog post prompting, “Leave a comment/reply”.

English on an Italian website? Does that look appealing to you?
Having a few English words here and there might be a small deal, but it could affect your website’s message if it happens often. So, how can you translate these strings without getting into complicated code stuff?
Thanks to Loco Translate, you can easily translate all the texts in your themes and plugins to your desired language.
A quick heads up: Loco Translate has multiple features but can’t do everything regarding translation. It only translates “static” content, i.e., content contained in your theme, plugins, and WordPress Core.
It also cannot translate every theme and plugin. This is because your theme or plugin must have translation capabilities implemented by its developer.
Before we start the step-by-step guide, check if the travel theme you’re using is ready for translation.
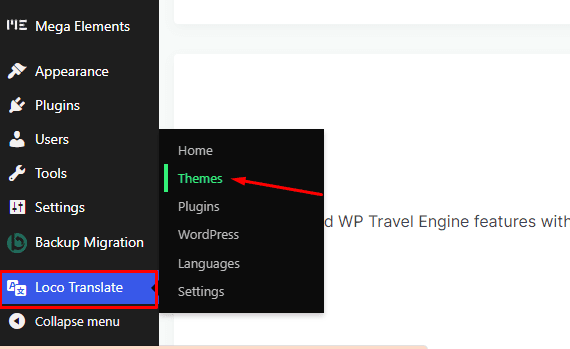
Step 1: Install and Activate the Loco Translate Plugin
- Go to Plugins > Add New from your WordPress dashboard
- In the search bar, type Loco Translate and press Enter.
- Click Install Now and then Activate to enable it.

Once you are done with it, the next step is to translate the theme and plugins of your choice.
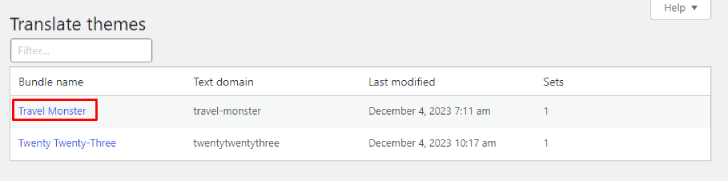
Step 2: Choose Your Theme from the List
- Go to Loco Translate > Themes from your WordPress dashboard. Identify the theme you want to translate and click on it.
By default, Loco Translate displays both the active themes on your site and those that are only installed.
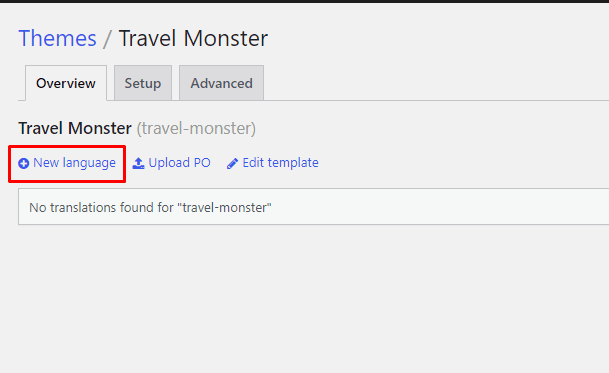
For this test, let’s take the Travel Monster theme.
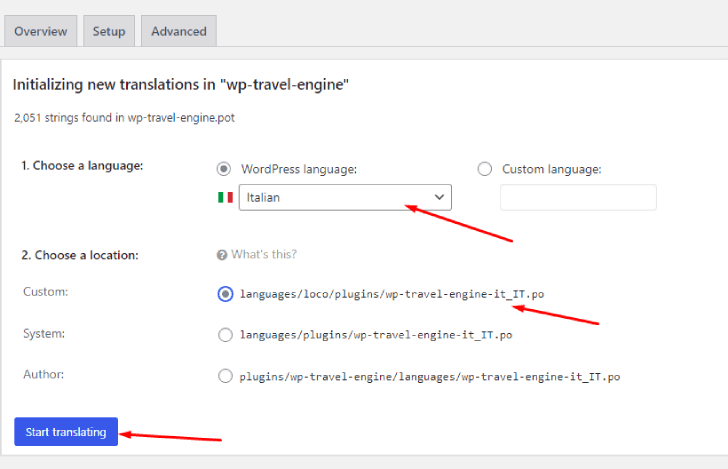
- Then click on the New Language button.
- Select the desired target language from the Choose a language dropdown menu.
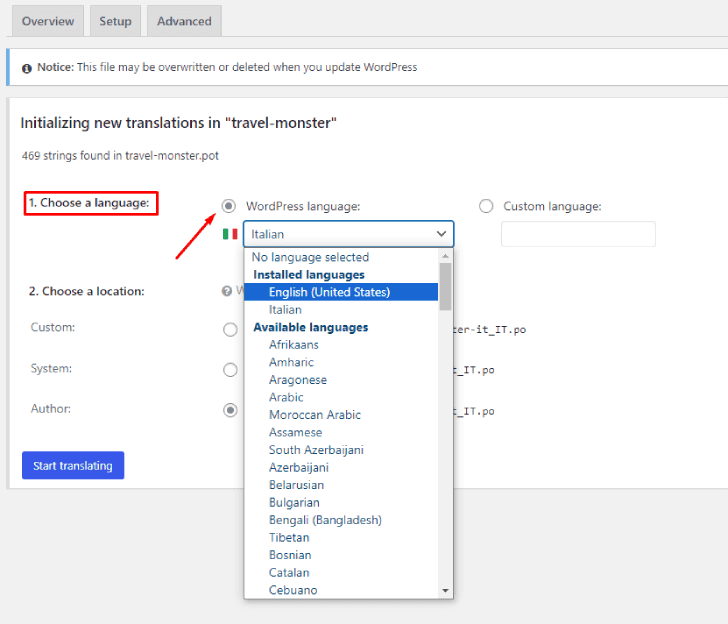
- Select a location where your translation file will be saved.
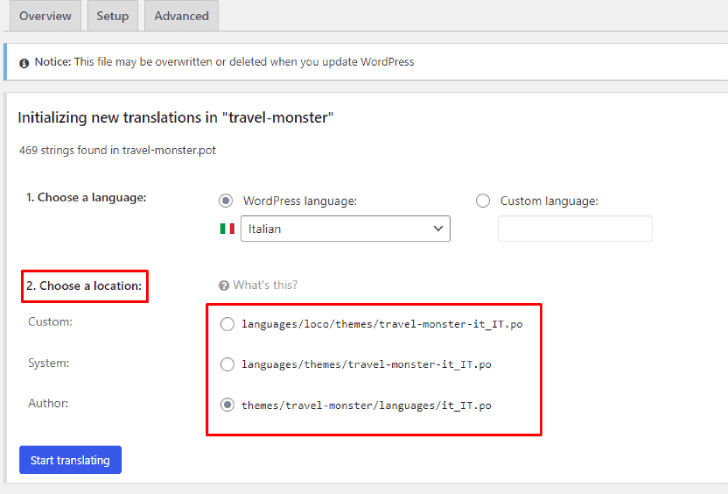
Here are three options to consider. It can be confusing if you’re unfamiliar with WordPress localization, but your chosen location is essential.
For now, select the Custom option as recommended by the developer. This option corresponds to the following path in my example: wp-content/languages/loco/themes/travel-monster-it_IT.po
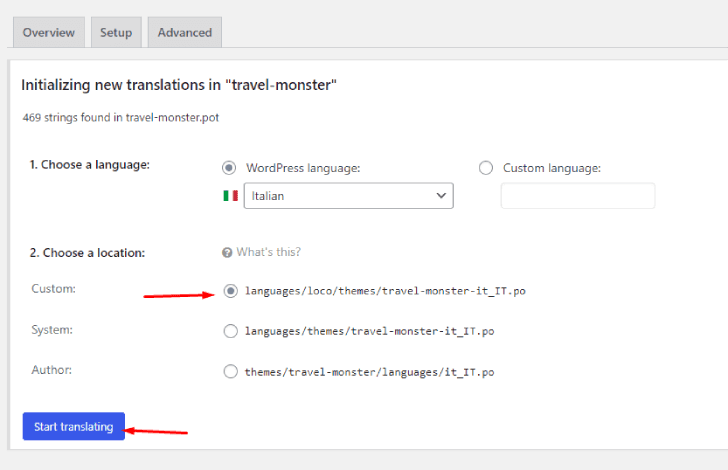
- Continue by clicking on the Start Translating button.
Step 3: Translate The Theme
Now, let’s translate specific strings of the Travel Monster theme, in our case, via the Loco Translate editor.
You’ll see a list of strings included in the theme’s template file. Select one from the list, or you can search using the Filter Translations field.
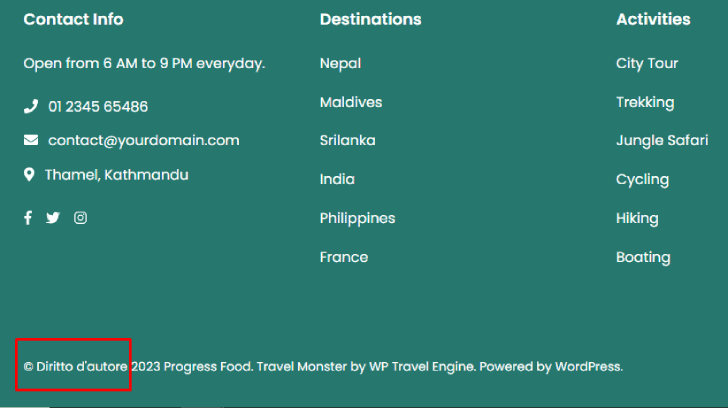
In our case, we searched for the “© Copyright” string, which we intend to translate into Italian.
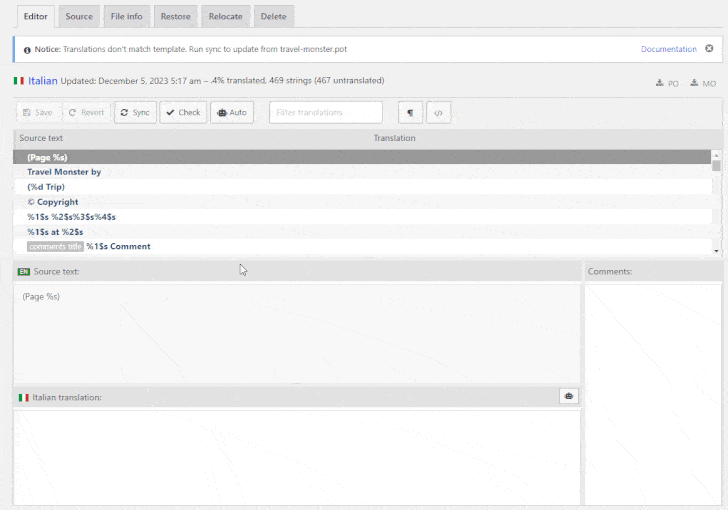
Then proceed as follows:
- Select the text of your choice in the Source text box by clicking on it.
- Write its translation in the Italian translation box.
- Click Save to apply your changes.

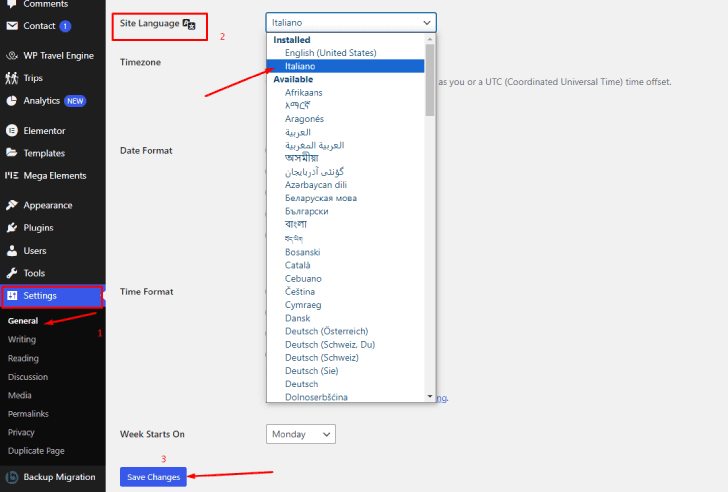
Step 4: Verify the Translation of Your Strings
To test that it worked, let’s compare what we’ve just translated before and after.
On your WordPress dashboard, navigate to Settings > General, then:
- Scroll down until you see the Site Language dropdown menu.
- From the dropdown list, choose a new language – Italian, in our case.
- Click on Save Changes.
Since we’ve translated the “© Copyright” string, let’s check the footer section. As expected, the string has been successfully translated.
Repeat the same process to translate more strings. Search the word, put in its translation, and save.
Step 5: Translate the Plugin
Like translating themes, you can follow the same steps to translate any plugin you choose. Given that most travel websites rely on travel booking plugins to create a comprehensive travel booking experience, we’ll focus on the popular travel booking plugin, WP Travel Engine.
- Go to Loco Translate > Plugin from your WordPress dashboard.
- Locate WP Travel Engine in the list of plugins and click on it.

As you can see, the plugin already offers translations in three languages:

- French – 100%
- German – 23%
- Hungarian -72%
Since we aim to translate strings into Italian, simply click “New language” to add it. Alternatively, if you wish to modify an existing translation, such as German, click on the “Edit” link.
Upon clicking New Language or Edit, you will be redirected to the plugin’s editor, which you will learn to navigate in the next section.
- Click on the Language tab and select the language you want to translate into. In this case, we will choose the Italian.
- Select a location where your translation file will be saved.
- Click on the Start Translating button.
Now, let’s translate specific strings of the WP Travel Engine.
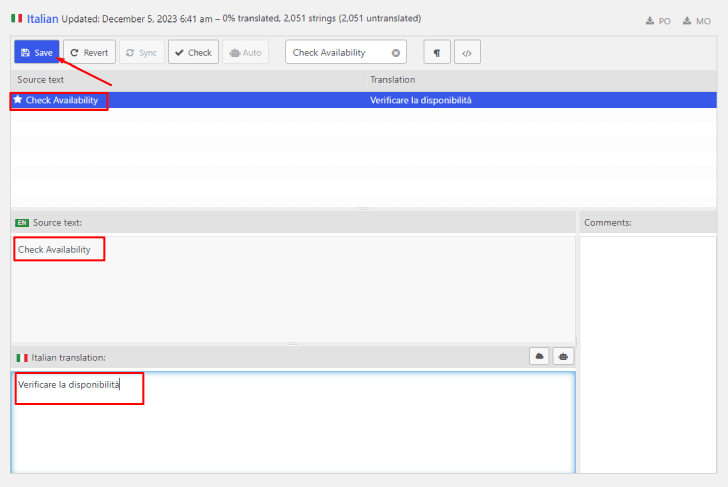
- Go to the Filter translations search bar to find specific strings to translate in the translation section. For example, type “Check Availability” into the search bar.
- Once you click on the string, the source text will appear.
- Write its translation in the Italian translation box.
- Click Save to apply your changes
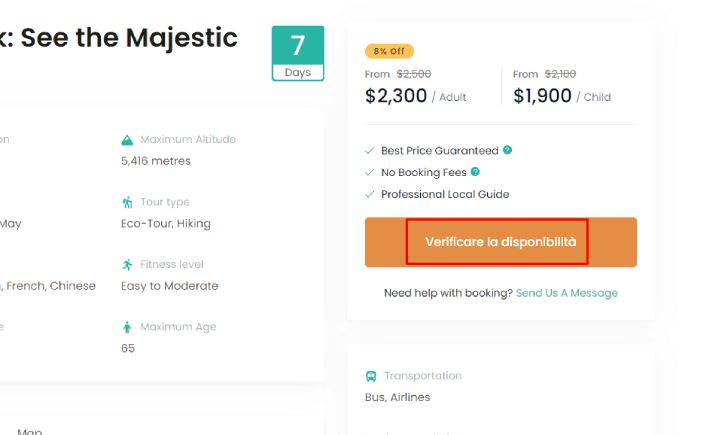
The last step is to verify that your translation is working. Follow STEP 4 as above and test whether it worked.
Apart from relying on Loco Translate, WP Travel Engine also offers an integrated translation-ready feature that simplifies the process of translating your website into multiple languages. This feature effectively handles your website’s short, simple static strings, such as menu items and page titles.
To use this feature, follow the steps below:
- Navigate to your WordPress dashboard and go to WP Travel Engine > Settings > Display > Labels tab.

- On the Labels tab, click the Plus button to add a new translation.

- In the Initial Label field, enter the original string you want to translate, while in the Modified Label field, enter the translated string.
For example, to translate the Initial label “Trip Name” into Italian, you would enter “Nome del viaggio” in the Modified Label field.

- Once you’ve entered the translation, click the Save & Continue button.
Conclusion
By now, you have comprehensively understood the key considerations and best practices for translating your travel website.
Taking this step is strategic, positioning your travel website for global relevance and heightened user engagement. Whether you opt for a WordPress translation plugin, professional translation services, or another method, the crucial aspect is to ensure your travel content is accessible and appealing to a broader audience.
Through an investment in a high-quality translation strategy, you open doors to new markets, elevate user experience, and ultimately propel growth for your business.
If you still have questions about the best way to translate a website, feel free to share them in the comments below!


Fantastic insights on translating travel websites! Making content accessible in multiple languages is crucial for reaching diverse audiences. I love the emphasis on cultural nuances—it’s essential for authentic travel experiences!